Complete Automation of NimbleText from the Command-Line
Once you buy a license for NimbleText, you unlock the power of the command-line.
Everything you do in NimbleText can be fully automated from the command-line.
First I'll give you the quick guide, then show you the built in command-line helper for NimbleText which makes this all too easy. Then provide the complete command-line reference which describes every possible commandline argument (aka parameter) and option (aka flag) as well as their abbreviations. And finally, quite a lot of tips for powershell users.

Quick tip: You can use \r,\n and \t to represent carriage return
(character 13), line feed
(character 10) and the infamous tab
(character 11) respectively.
Table of contents
Quick Guide
The most common use case for the command-line is that you want to send in a data file, specify a pattern, and write the output to a file. Here's how you do that:
Assuming we have a file called 'data.csv' that contains our data:
NimbleText.exe -i "Data.csv" -p "$0 is $1" -o "output.txt"
Here we've specified an inputdatafile (using the abbreviation '-i'),
a pattern argument (using '-p') and an outputfile
(-o).
Specify your data
There's two ways you can specify the input data: inputdatafile to get
input from a file (as shown above), or rawdata to specify raw input
directly at the command-line.
See also:
Specify your pattern
There are two ways you can specify the pattern: patternfile to get
the pattern from a file, or pattern to specify the pattern directly
at the command-line (as shown above)
If you don't specify both your input or your pattern, then the GUI will be shown.
See also:
Specify your output
There are three different ways you can receive the output. If you use the 'gui'
flag, then the user interface will be shown, and you can access the result there.
You can specify an output file, and the result will be written there, using the
'outputfile' argument.
If you don't specify the outputfile argument, or the gui
flag, then the output is written to standard out.
If you don't specify an output file, then it is written to the console.
Redirecting output to a file: No.
Even though NimbleText and the command-line are good friends, NimbleText is not a console application, it is a Windows application. (If it was a console app, you'd see a command prompt flash into existence, momentarily, every time you run the exe).
And because NimbleText is not a console
application, you cannot use a redirect operator (
) to direct the output directly into a file. To send its output to a file, you need to use the >--outputfile (-o) argument, and specify a filename.
See also:
The Command-Line Helper
Under the tools menu you'll find the Command-Line Helper. This is a handy built-in tool to make command-line automation dead simple.
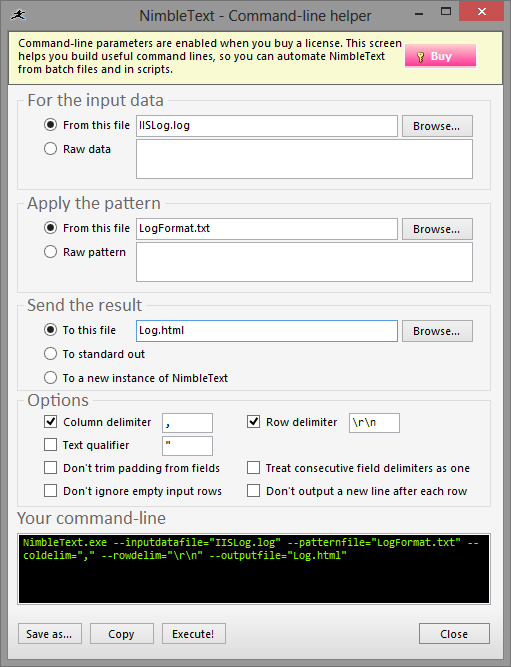
Just pick the options you want and, as you do, a sample of the required command-line is provided at the foot of the form.
Once you're happy with it you can save it as a batch
file, or copy it to the clipboard.
You can also press 'execute' to try it out immediately.
(A command prompt will open up, and run the command-line you've built up.)
All tools that run from the command-line should provide a helper like this!
Complete command-line reference
- 'rawdata' Argument (-d)
- 'pattern' Argument (-p)
- 'inputdatafile' Argument (-i)
- 'patternfile' Argument (-f)
- 'outputfile' Argument (-o)
- 'rowdelim' Argument (-r)
- 'coldelim' Argument (-c)
- 'qualifier' Argument (-q)
- 'where' Argument (-w)
- 'wherefile' Argument
- 'includepadding' Option (-l)
- 'jumpconsec' Option (-j)
- 'nonewline' Option (-n)
- 'includeemptyrows' Option (-e)
- 'unixeol' Option (-e)
- 'gui' Option (-g)
- 'help' (-h, -?)
'rawdata' Argument (-r)
Argument Name: rawdata
Abbreviation: d
Purpose: Specify the raw input data
Example:
NimbleText.exe --rawdata "A,B,C" -p "$0 is $1"
Result:
B is A
'pattern' Argument (-p)
Argument Name: pattern
Abbreviation: p
Purpose: Specify the pattern
Example:
NimbleText.exe --rawdata "A,B,C" --pattern "$0 is $1"
Result:
B is A
'inputdatafile' Argument (-i)
Argument Name: inputdatafile
Abbreviation: i
Purpose: Specify a filename for loading the input data
Example:
NimbleText.exe --inputdatafile "Data.csv" --pattern "<% $row.toUpperCase() %>"
Result: The content of Data.csv, in upper case, is written to standard out.
'patternfile' Argument (-f)
Argument Name: patternfile
Abbreviation: f
Purpose: Specify a filename for loading a pattern
Example:
NimbleText.exe -i "Data.csv" --patternfile "inputPattern.txt"
Result: The content of Data.csv in transformed by the pattern loaded from inputPattern.txt and the result is written to standard out.
'outputfile' Argument (-o)
Argument Name: outputfile
Abbreviation: o
Purpose: Specify a filename to store the results
Example:
NimbleText.exe -i "Data.csv" --pattern "<% $row.toUpperCase() %>" --outputfile "out.txt"
Result: The content of Data.csv in transformed by the pattern provided and the result is written to the file out.txt.
'rowdelim' Argument (-r)
Argument Name: rowdelim
Abbreviation: r
Purpose: Specify the row delimiter to use when process the input data.
Example:
NimbleText.exe -i "Data.csv" --pattern "<% $row.toUpperCase() %>" --outputfile "out.txt" --rowdelim "\n"
'coldelim' Argument (-c)
Argument Name: coldelim
Abbreviation: c
Purpose: Specify the column delimiter
Example:
NimbleText.exe -i "Data.csv" --pattern "$3" --outputfile "out.txt" --coldelim "|"
'where' Argument (-w)
Argument Name: where
Abbreviation: l
Purpose: Apply a javascript expression to filter rows
Example:
NimbleText.exe -i "Data.csv" -p "$3,$7" -w "$0 > 12 && $2 != 'fred'"
'wherefile' Argument
Argument Name: wherefile
Abbreviation: none
Purpose: Apply a javascript expression from a file to filter rows
Example:
NimbleText.exe -i "Data.csv" -p "$3,$7" -wherefile "where.js"
'qualifier' Argument (-q)
Argument Name: qualifier
Abbreviation: q
Purpose: Specify text qualifier character to use when parsing input. Defaults to double-quote.
Wait a second: What is a text-qualifier?
Qualifiers are used to escape embedded delimiters. For example, in this data:
1997,Ford,E350,"Super, luxurious truck"
The text "Super, luxurious truck" would be treated as one field, despite the commas, because it is 'qualified' by being surrounded with double-quotes (the default text-qualifier).
To ignore a literal qualifier, double-it.
Example:
NimbleText.exe -i "Data.csv" -p "$3,$7" -q "'"
'includepadding' Option (-l)
Argument Name: includepadding
Abbreviation: l
Purpose: Flag to include padding around fields (don't trim fields).
By default, each field is trimmed of its surrounding whitespace before being processed. To stop this from happening, add a -l flag to the command line.
Example:
NimbleText.exe -i "Data.csv" -p "$3,$7" -l
'jumpconsec' Option (-j)
Argument Name: jumpconsec
Abbreviation: j
Purpose: Flag to treat consecutive field delimiters as one
Example:
NimbleText.exe -r "a b" -p "$1,$2" --coldelim " " -j
Result:
a,b
'nonewline' Option (-n)
Argument Name: nonewline
Abbreviation: n
Purpose: Don't output a new line after each row
Example:
NimbleText.exe -d "People.csv" -p "$0;" --nonewline
Result:
Jack;Jill;Jenny;Peter
'includeemptyrows' Option (-e)
Argument Name: includeemptyrows
Abbreviation: e
Purpose: flag to include empty rows (don't ignore them)
By default, empty rows are ignored and this is usually pretty helpful. But sometimes you want the empty rows, so in those cases use the --includeemptyrows (or -e) flag.
Example:
NimbleText.exe -d "Poem.csv" -p "<p>$row</p>" --includeemptyrows
'unixeol' Option
Argument Name: unixeol
Abbreviation: none
Purpose: when saving files, convert all line-endings to "Unix Style" (\n) instead of "Windows Style" (\r\n). If this option is omitted, files will be saved with Windows Style line-endings.
Example:
NimbleText.exe -i "Data.csv" -p "$0 is $1" -o "output.txt" --unixeol
'gui' Option (-g)
Argument Name: gui
Abbreviation: g
Purpose: Show the Graphical User Interface
If you provide a commandline argument for the data (such as -d) and a commandline argument for the pattern (such as -p) then the output will be sent to standard out. If you instead want to show the gui, use the -g flag. Note also, that if you provide no arguments, or provide incomplete source for pattern and data, then the gui is also shown.
Example:
NimbleText.exe --gui
'help' Option (-?, -h)
Argument Name: help
Abbreviation: h
Purpose: Show a message much like the following, and exit.
Example:
NimbleText.exe --help

NimbleText version 2.8.0.38449
Manipulate text with nimble patterns.

Usage: NimbleText.exe [options]
If no options are specified, a gui is presented.

            Options:
  -d, --rawdata=VALUE        the raw input data
  -s, --pipeline             stream input data via the pipeline
  -p, --pattern=VALUE        the pattern
  -i, --inputdatafile=VALUE  a filename for loading the input data
  -f, --patternfile=VALUE    a filename for loading a pattern
  -o, --outputfile=VALUE     a filename to store the results
  -r, --rowdelim=VALUE       the row delimiter
  -c, --coldelim=VALUE       the column delimiter
  -q, --qualifier=VALUE      text qualifier character (defaults to double quote)
  -w, --where=VALUE          Apply a javascript expression to filter rows
      --wherefile=VALUE      Apply a javascript expression from a file to
                               filter rows
  -l, --includepadding       include padding around fields (don't trim fields)
  -j, --jumpconsec           treat consecutive field delimiters as one
  -n, --nonewline            don't output a new line after each row
  -e, --includeemptyrows     include empty rows (don't ignore them)
      --unixeol              when saving files convert all line endings to "
                               Unix Style" (\n)
  -g, --gui                  show the Graphical User Interface
  -?, -h, --help             show this message and exit
PowerShell Tips
NimbleText can be used from PowerShell for many different purposes.
There is one "gotcha" to be aware of, and then I'll show a few useful tricks.
Dollar signs ($) have a special meaning in PowerShell, indicating a variable. So when you are using PowerShell to send a raw pattern to NimbleText that contains a literal dollar sign (for NimbleText to use), you will need to escape
the dollar sign, by placing a backtick (`) before it.
For example:
.\NimbleText.exe --rawdata="Rey\nLuke" --pattern="Hello `$row"
Returns:
Hello Rey
Hello Luke
Alternatively, if you use single quotes to surround a string then PowerShell will not try to perform variable expansion. So in this example the $ signs do not need to be escaped, because the string is wrapped in single quotes.
.\NimbleText.exe --rawdata="Menace,Phantom\nAwakens,Franchise" `
    --pattern='$onceA long time ago...\n$eachThe $1 $0'
Produces:
A long time ago...
The Phantom Menace
The Franchise Awakens
Conversely, if you use NimbleText to generate PowerShell scripts, you may need to emit a literal dollar sign, so use the $dollar; keyword in NimbleText.
Now here's a really powerful thing. The output of NimbleText can be manipulated on the pipeline:
.\NimbleText.exe --rawdata="Rey\nLuke" --pattern="Hello `$0" |
    ForEach-Object {"Greetings"}{$_}{"The End."}
Returns:
Greetings
Hello Rey
Hello Luke
The End.
(We used a Begin and End scriptblock in that example)
And if you are using NimbleText to generate Powershell scripts, you can run them immediately, by using the Invoke-Expression cmdLet:
.\NimbleText.exe --rawdata="txt\ndll" --pattern="dir *.`$row" |
    ForEach-Object { Invoke-Expression $_}
The example above generates the output:
dir *.txt
dir *.dll
...and immediately executes each command. This technique could be dangerous. With great power comes great responsibility, etc.
Oh -- and in reality, a Powersheller would probably use the '%' alias and the 'iex' alias, to simplify the command like so:
.\NimbleText.exe --rawdata="txt\ndll" --pattern="dir *.`$row" |
    % { iex $_}
Because, in the example above, PowerShell executes the output one row at a time, you may want to join all of the output together before you execute it. This can be achieved in powershell using the -join operator.
(.\NimbleText.exe --rawdata="txt\ndll" --pattern="dir *.`$row" |
  select) -join "`n" | iex
Sending Powershell info to NimbleText
NimbleText is a Win32 GUI application, not a true console
application. As a consequence you can not pipe
(i.e.
) data directly into |NimbleText.exe. (Incidentally -- I'm working on a way to enable this in a future version, using an intermediate NimbleText.com
com file)
Hence, this does not work:
> dir | .\NimbleText.exe
For adhoc work, the simplest way to get the result of a command into NimbleText is to use your clipboard.
> dir | clip
.\NimbleText.exe
(then paste the result into NimbleText)
Though you can also use PowerShell variables to achieve the same thing, e.g.
> $p = dir
.\NimbleText.exe --rawdata=$p --gui
Powershell has powerful built in support for "CSV" -- and will convert any object to CSV using the ConvertTo-Csv Cmdlet. eg:
> Get-Process | ConvertTo-Csv
(a LOT of csv data is produced....)
Generally, you need to add the -NoTypeInformation parameter, to ConvertTo-Csv to get "pure" csv output. Otherwise, the first line of output will not be Csv, but something like #TYPE System.Diagnostics.Process
Putting all of that together, here's an example of using Powershell to open NimbleText with the contents of the curent folder.
> $p = (dir | ConvertTo-CSV -NoTypeInformation)
> $p2 = $p.replace('"','""').replace("`t","\t").replace("`r","\r").replace("`n","\n")
> .\NimbleText.exe --rawdata=$p2 --gui
To explain: we first put the content of the current folder into a variable, $p, then we escaped any double-quotes, tabs, carriage-returns and new-lines, so that the commandline would not take these literally. And we sent that escaped variable in to NimbleText via the rawdata parameter. It is a little unwieldy, but it works a treat.
If instead you prefer to use the clipboard, here is a different technique:
> dir | ConvertTo-CSV -NoTypeInformation | clip
.\NimbleText.exe
(Now paste the result into NimbleText...)
Or, another way is to pipe the data into an intermediate file, and open that file in NimbleText:
> dir | ConvertTo-CSV -NoTypeInformation | out-file "file_details.csv" -Encoding utf8
>.\NimbleText.exe -i=file_details.csv --gui
Loading CSV data with Powershell
If you've used NimbleText to produce a CSV file, and you wish to load that file with Powershell, you can use the Import-Csv cmdlet. For example:
$myDir = Import-Csv "dirinfo.csv";
Using Powershell and NimbleText together to generate multiple files...
With a little bit of fancy footwork you can write one pattern that produces many files. This magic is achieved by putting your pattern inside a PowerShell here string, and piping the here string
to a file.
I'll start slowly and build up to the trick.
So, if we have data like this:
Day,Weather,Sunset
Monday,Sunny,5:51pm
Tuesday,Windy,5:52pm
Wednesday,Rainy,5:53pm
Let's say we want to create 2 files: one for the weather and one for the sunset times.
We can start with a pattern like this:
$ONCE
Weather
$Each+
$0,$1
$ONCE

Sunset
$Each+
$0,$2
$ONCE
Which produces this output:
Weather
Monday,Sunny
Tuesday,Windy
Wednesday,Rainy

Sunset
Monday,5:51pm
Tuesday,5:52pm
Wednesday,5:53pm
It is just one piece of output, but it has the two different chunks of information. Now we need to find a way to put each of them into a separate file.
We apply the here-string trick, to turn the data into an executable powershell program, like so...
Here is our new NimbleText pattern:
$ONCE
@"
$Each+
$0,$1
$ONCE
"@ | out-file Weather.txt

@"
$Each+
$0,$2
$ONCE
"@ | out-file sunset.txt
And the result would be this:
@"
Monday,Sunny
Tuesday,Windy
Wednesday,Rainy
"@ | out-file Weather.txt

@"
Monday,5:51pm
Tuesday,5:52pm
Wednesday,5:53pm
"@ | out-file sunset.txt
We can safely copy that output into a powershell console, press enter, and the files will be created!
Weather.txt will contain:
Monday,Sunny
Tuesday,Windy
Wednesday,Rainy
And sunset.txt will contain:
Monday,5:51pm
Tuesday,5:52pm
Wednesday,5:53pm
You could use the same technique to produce a new file for every single line of your source data!
If we save a pattern like this, we can also reuse it, for all our file generating needs, and execute it directly from powershell.
For the next example, let's assume we had that same data in a file called WeatherData.csv, and the pattern stored in WeatherPattern.txt, then we could perform bulk file creation, from powershell, with this command:
(.\NimbleText.exe --inputdatafile="WeatherData.csv" `
--patternfile='WeatherPattern.txt' | select) -join "`n" | iex
When writing patterns on the powershell commandline, if they involve embedded here strings, the escaping rules can get very complex. Here's a working example, though I would hardly recommend this approach:
(.\NimbleText.exe --rawdata="First File1\nSecond File" `
--pattern='@\"\n $rowNumOne row says $row \n\"@ > file$rowNumOne.txt;' |
select) -join "`n" | iex
This produces two files, with appropriate messages in each.
Further help
You can also get general help, help on all the symbols and keywords, or on the built-in functions, filtering with a where clause, help with the powerful command-line automation, or applying custom formats to your dates and times.
- General help
- Symbols and Keywords
- Built-in Functions
- The 'Where' clause
- Date Time formatting
- Date Time parsing
- Command-Line Automation
- SQL Master Class
- HTML Master Class
- Popular Text Manipulations Made Easy «« bookmark this one
You need to purchase a license to unlock all the features in NimbleText.
If you haven't downloaded NimbleText yet, then for added power, privacy and versatility I sincerely think you should download it now.
Download NimbleText
